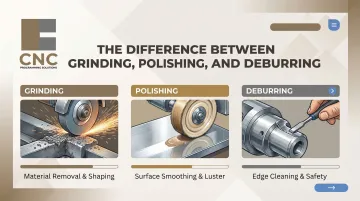
Introduction
Grinding, polishing, and deburring are all finishing processes applied after CNC machining operations — yet many manufacturers confuse them, treating them as interchangeable steps. That confusion leads to real consequences: parts that fail quality checks, assembly issues, premature wear, and regulatory non-compliance in aerospace and medical applications.
The difference isn't just semantic. Each process serves a distinct purpose, uses different tooling, and removes material at a completely different scale. Mixing them up — or sequencing them wrong — creates problems:
- Grinding when you need deburring introduces new surface defects
- Skipping deburring before polishing hides sharp edges beneath a smooth finish
- Reversing the sequence results in rework, scrap, and lost production time
This article clarifies what each process actually does, how they differ in material removal and tooling, and when each belongs in a CNC machining workflow — so your parts clear quality inspection on the first pass, not the third.
Key Takeaways
- Grinding removes significant material using abrasive wheels to achieve shape, dimension, or surface finish (Ra 4–32 microinches)
- Polishing refines surface texture with finer abrasives for smoothness and appearance, without altering dimensions
- Deburring removes sharp burrs at edges left by machining — essential for safety, fit, and compliance
- Correct sequence: grinding first, deburring second, polishing last; reversing the order wastes effort and introduces defects
What Is Grinding?
Grinding is a precision machining process where bonded abrasive particles (wheels or belts) remove material from a workpiece to achieve a specific shape, dimension, or surface finish. Unlike milling or turning, which achieve surface roughness (Ra) of 125 to 32 microinches, grinding achieves significantly finer finishes — typically 32 microinches Ra down to 4.0 microinches Ra and better. The process drives material removal through cutting, plowing, and rubbing actions as the abrasive wheel rotates against the workpiece surface.
Types of Grinding in CNC Contexts
Part geometry determines which grinding technique you use:
- Surface grinding - Flattens and smooths flat surfaces using a horizontal or vertical spindle
- Cylindrical grinding - Finishes the outer diameter of round parts, shafts, and pins
- Internal grinding - Refines inside bores, holes, and cylindrical cavities
Each type requires specific machine setups and fixturing, but all achieve tolerances down to 0.5 micrometers.
Tools and Abrasives
Grinding wheels vary by abrasive type, and selecting the wrong one causes problems:
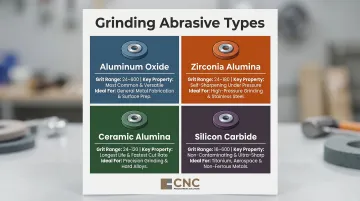
- Aluminum oxide (24-600 grit): Most common and least expensive, suitable for most metals but dulls during use
- Zirconia alumina (24-180 grit): Self-sharpening with large fracture planes, ideal for high-pressure metal grinding
- Ceramic alumina (24-120 grit): Longest life and fastest cut rate, self-sharpening with very small fracture planes
- Silicon carbide (16-600 grit): Non-contaminating option for titanium alloys, cast iron, glass, and plastics in aerospace applications
Abrasive hardness selection matters: too soft and the wheel won't cut adequately; too hard and the workpiece risks heat distortion. Grinding energy converted to heat can raise surface temperatures up to 1500°C, causing grinding burn.
Output Goals and Surface Roughness
Grinding achieves specific dimensional tolerances and defined surface roughness values measured using a profilometer or surface comparator. Expected finishes by grit:
| Abrasive Type | Grit | Ra (microinches) |
|---|---|---|
| cBN | 100 | 35-40 |
| cBN | 220 | 15-20 |
| cBN | 400 | 4-8 |
| Diamond | 100 | 24-32 |
| Diamond | 220 | 10-12 |
| Diamond | 400 | 7-8 |
These Ra values matter before downstream processes like coating or assembly — a coating applied over an improperly ground surface won't adhere correctly.
Grinding also generates burrs as a byproduct, which is why deburring typically follows grinding in the process sequence.
What Is Polishing?
Polishing is a surface finishing step that uses finer, softer abrasives — polishing compounds, buffing wheels, non-woven abrasive pads — to remove micro-level surface imperfections: scratches, grinding marks, and surface films. The goal is achieving a specific texture or appearance rather than changing part dimensions.
The result can range from a matte industrial texture to a mirror-like finish, depending on the application — aerospace, medical, and decorative parts each have different requirements.
Spectrum of Polishing Outcomes
Polishing outcomes range from industrial to decorative finishes:
- #3 Satin finish (60-80 grit): 50 Ra microinches, coarser appearance for industrial applications
- #4 Satin finish (120-180 grit): 32 Ra max, industry standard for stainless steel
- #6 Satin finish (240-320 grit): 20 Ra max, finer and smoother than #4
- #8 Mirror finish (400+ grit): Approximately 1 microinch Ra, highly reflective for medical instruments and aerospace components
Surface roughness decreases significantly with finer grits:
| Grit | Ra (microinches) |
|---|---|
| 120 | 52 |
| 180 | 30 |
| 220 | 19 |
| 320 | 12 |
| 400 | 9 |
| 500 | 4 |
For applications requiring even tighter surface quality, electropolishing can reduce starting Ra by approximately 50% through chemical refinement — useful when mechanical abrasion alone can't achieve the required spec.
Methods and Sequence
Polishing methods include:
- Hand polishing: Labor-intensive, suitable for small batches or complex geometries
- Machine polishing: Consistent results for larger production runs
- Robotic polishing: Automated precision for high-volume manufacturing
Polishing comes after grinding in the finishing sequence. It refines surface texture but doesn't remove burrs or significantly alter dimensions — both of which require dedicated processes covered in the sections below.
What Is Deburring?
Deburring is the targeted removal of burrs — small raised fragments of metal (or other material) that form at the edges of a workpiece during cutting, milling, drilling, stamping, or grinding. These raised edges aren't just cosmetic problems.
Why Burrs Are a Problem
Burrs cause serious issues:
- Injury risk: Sharp edges cut operators during handling and assembly
- Assembly failures: Parts don't fit properly, jamming or failing to seat correctly
- Fluid/electrical path disruption: Burrs block oil and coolant flow, interfere with seals in powertrain applications
- Stress concentration points: Burrs create weak spots that lead to cracks and premature part failure
In industries like aerospace, medical devices, and automotive, strict standards mandate burr-free surfaces. Parts that skip this step fail inspections, trigger costly rework, and in regulated industries, can pull an entire production run out of compliance.
Common Deburring Methods
Deburring techniques vary by part size, geometry, and production volume:
- Hand files, scrapers, and sandpaper work for small or geometrically complex parts — slow, but precise where automated methods can't reach
- Vibratory tumble deburring processes batches of parts with abrasive media (ceramic chips, stones), delivering consistent results cost-effectively on high-volume runs
- CNC-programmed deburring runs end mills or chamfering tools along a programmed path for controlled, repeatable burr removal on tighter-tolerance parts
CNC Programming Solutions offers vibe deburring as part of its post-machining workflow, processing parts in batches to ensure smooth, burr-free edges before downstream operations like bead blasting or coating.
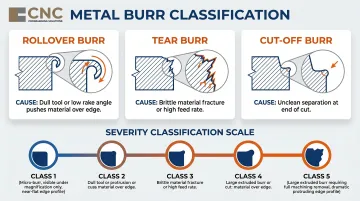
Types of Burrs
Identifying the burr type helps select the right deburring approach:
- Rollover burrs: Form on the exit side of milling, drilling, or turning operations where material rolls over the edge — generally large and well-attached
- Tear burrs: Result from material tearing rather than cutting cleanly. Dull tooling and excessive feed rates are the usual culprits, and tear burrs are often irregular and harder to remove consistently
- Cut-off burrs: Left behind when a cut piece breaks away from the part, common in saw cuts and screw machine parts
Burrs are classified by severity from Class 1 (micro-burrs visible only under magnification) to Class 5 (very large extruded burrs requiring grinding or machining to remove). Automated brush deburring works best on burrs with root thickness of 0.008 inches or less.
Why Deburring Is Non-Optional
Deburring accounts for 15-20% of manufacturing costs in most industries, and up to 30% for high-precision parts. Those costs are real, but the regulatory exposure is often steeper. Aerospace (AS9100), medical devices (FDA 21 CFR Part 820, ISO 13485), and automotive (IATF 16949) standards all require documented deburring processes and verifiable burr-free surfaces — there's no workaround.
Grinding vs. Polishing vs. Deburring: Key Differences Compared
Primary Purpose Distinction
Each process has a distinct goal:
- Grinding: Material removal and dimensional shaping to achieve tight tolerances and defined surface finish
- Polishing: Surface texture refinement for smoothness and appearance, not dimensional change
- Deburring: Edge safety and part conformance by removing sharp burrs
Confusing them — or using them interchangeably — leads to sequencing errors, rework, and scrap.
Material Removal Scale
The amount of material removed varies dramatically:
- Grinding removes the most material : reshaping the workpiece and achieving dimensional accuracy
- Deburring removes very small amounts : only at edges where burrs formed
- Polishing removes the least : surface micro-peaks only, typically reducing Ra by 50%
Applying these in the wrong order wastes effort or introduces new defects — which is why sequence matters as much as technique.
Tools and Abrasive Aggressiveness
The abrasives and tools differ by process:
| Process | Typical Grit Range | Abrasive Type | Ra Achievable |
|---|---|---|---|
| Grinding | 24-120 (conventional); up to 400 (superabrasive) | Aluminum oxide, zirconia, ceramic, silicon carbide | 32-4 microinches (0.8-0.1 µm) |
| Deburring | Varies by method | Media (ceramic chips, stones), brushes, cutting tools | Not primary objective |
| Polishing (satin) | 120-320 | Fine abrasives, non-woven pads | 32-12 microinches (0.8-0.3 µm) |
| Polishing (mirror) | 400-500+ | Buffing compounds, ultra-fine abrasives | Less than 4 microinches (< 0.1 µm) |
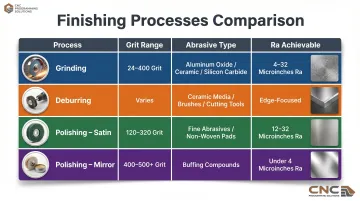
The grit range alone tells the story: grinding works in the 24-120 range to cut aggressively, deburring targets only edge material with brushes or media, and polishing operates at 400+ to refine texture without touching dimensions.
Correct Sequence
The proper order matters:
- Grinding first - Shape the part and achieve dimensional tolerance
- Deburring second - Remove edge burrs created during grinding and machining
- Polishing last - Final surface refinement for texture and appearance
Industry workflows confirm this sequence: Machining → Deburring → Surface Grinding → Polishing/Buffing → Chamfering → Brushing → Sandblasting → Washing.
Reversing or skipping steps leads to rework and scrap. Polishing before deburring tears polishing media and leaves sharp edges under the surface finish. Grinding to remove burrs introduces new surface issues and is imprecise.
How These Three Processes Fit Into CNC Machining — and What Goes Wrong
Why All Three Are Routinely Required
In a CNC machining environment, parts come off the machine dimensionally correct but with rough surfaces, sharp edges, and burrs. Before inspection, assembly, or coating, these issues must be addressed through finishing operations.
Primary operations (milling, turning, drilling) produce surface finishes of Ra 0.8–3.2 µm — too rough for most precision applications. Required specs vary by industry:
- Medical devices: Ra 0.4–0.8 µm for general surfaces; below 0.2 µm for functional surfaces
- Aerospace and defense: Documented surface finish specifications required per component
- General precision parts: Typically Ra 0.8 µm or better before coating or assembly
CNC Programming Solutions handles this by integrating vibe deburring and bead blasting directly into the post-machining workflow, so parts move from machine to finishing to quality check without leaving the production sequence.
When that sequence breaks down — or when the wrong method is applied — the consequences show up in rework, scrap, and failed inspections. These are the most common mistakes.
Common Mistakes
Using grinding to remove burrs: Grinding can remove burrs but often introduces new surface issues. It's imprecise for edge work and wastes time on a task better suited to deburring methods.
Skipping deburring before polishing: Burrs tear polishing media, damage buffing wheels, and leave sharp edges hidden beneath a smooth surface. Polishing doesn't remove burrs — it hides them temporarily.
Over-polishing before dimensional verification: Polishing can mask surface defects that a CMM (coordinate measuring machine) will still detect during inspection. Dimensional accuracy must be confirmed before final polishing.
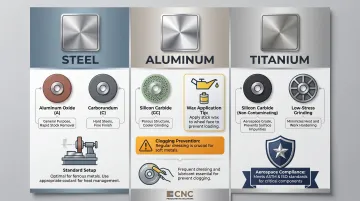
Wrong abrasive selection: Using aluminum oxide wheels on aluminum causes clogging. Silicon carbide is required for porous, open-structured grinding of aluminum. Titanium requires non-contaminating abrasives to meet aerospace standards.
Cost Impact and Material Considerations
Choosing the right finishing method for each part material and geometry directly affects cycle time and scrap rate. Manual deburring costs approximately $6.25 per piece at $25/hour labor rates, with complex geometries requiring up to 15 minutes per part. Automated vibratory deburring reduces this dramatically — one manufacturer saved 60 hours of labor per year by automating.
Scrap and rework cost the average manufacturer up to 2.2% of annual revenue. In aerospace and energy applications, scrapping a single expensive part can cost hundreds of thousands of dollars.
Material type influences process selection:
- Steel: Aluminum oxide and carborundum wheels for grinding
- Aluminum: Requires porous, open-structured silicon carbide wheels; rub wheel surface with wax to prevent clogging
- Titanium: Silicon carbide abrasives (non-contaminating) for aerospace applications
Harder materials extend both machining and finishing time — a factor that must be built into production scheduling from the start, not treated as an afterthought once parts come off the machine.
Frequently Asked Questions
What is the difference between grinding and deburring?
Grinding removes significant material to shape or finish a part's surface using abrasive wheels, achieving tight tolerances and defined Ra values (typically 4-32 microinches). Deburring specifically removes small raised burrs at edges left by machining operations using media, brushes, or cutting tools — they have different material removal scales, tools, and goals.
What is deburring used for?
Deburring removes sharp burrs and raised edges from machined parts to ensure worker safety, correct part fit during assembly, regulatory compliance (AS9100, ISO 13485, IATF 16949), and prevention of stress risers that cause cracking or premature wear in service.
What are common mistakes in grinding?
The most frequent errors include using the wrong abrasive hardness or grit for the material (aluminum oxide on aluminum causes clogging), applying too much pressure (causing heat distortion up to 1500°C or glazing the wheel), and not dressing the grinding wheel regularly — all of which result in poor surface finish, dimensional inaccuracy, or grinding burn.
Which comes first: grinding, polishing, or deburring?
Grinding comes first to achieve shape and dimension, then deburring removes edge burrs, and finally polishing refines surface texture. Reversing the order damages tooling — burrs tear polishing media — and introduces defects that require rework.
Do all CNC machined parts need to be deburred?
Yes — every cutting, drilling, or milling operation leaves behind burrs. The method and intensity vary based on part material, geometry, and industry (aerospace, medical, and automotive all mandate documented deburring processes), but skipping it entirely is rarely acceptable in precision manufacturing.